Good depth of text, metal tensile test must know the index
Release time:2022-02-09Click:935
Tensile test is a simple mechanical performance test, in the test distance, the force is uniform, the stress-strain and its performance index measurement is stable, reliable, convenient for theoretical calculation. Through tensile test, the most basic mechanical properties of materials in elastic deformation, plastic deformation and fracture process can be determined, for example, elastic modulus E, yield strength Σ0.2, yield point σs, tensile strength σb, elongation at break δ and section shrinkage ψ, etc. . The mechanical properties, such as e, Σ0.2, σs, σb, δ, ψ, obtained from tensile test, are the basic properties of materials and the main basis of engineering design. Tensile test is the most common test of Metal Mechanical Properties, the same material through different tensile test process measurement results are not necessarily the same. What are the factors that affect the tensile test?
01 because of the uneven distribution of components, tissues, structures, defects and deformation in the sampling site and the method materials, there are differences in different parts of the same batch or even the same product, the provisions of the appendix to Gb/t-228 shall be strictly followed.
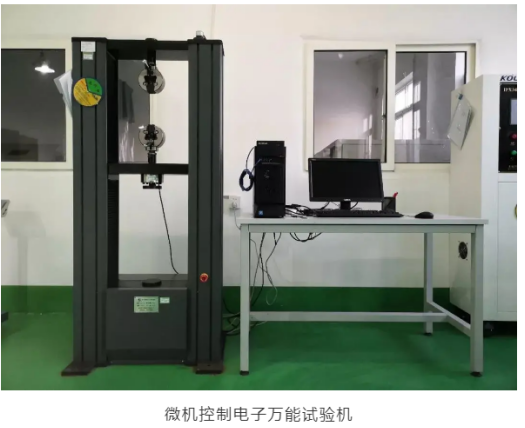
02 testing equipment testing equipment testing equipment directly affects the accuracy and authenticity of the results, so it is necessary to ensure that the testing machine in the verification of the validity period. The WDW-50 universal testing machine is shown in the picture. The equipment is checked and checked regularly.
03 The influence of test environment mainly includes the influence of environment temperature and the choice of clamping apparatus.

04 test method selection test method mainly includes clamping method, drawing rate, drawing cross-section area and pattern size measurement method, should choose the outside diameter micrometer, Vernier Caliper or rectangular sample with Vernier Caliper. In addition, the difference of subjective factors and operation skills will bring error to the measurement result. Therefore, inspectors should be strictly trained and tested in accordance with the GB/T-228 method.
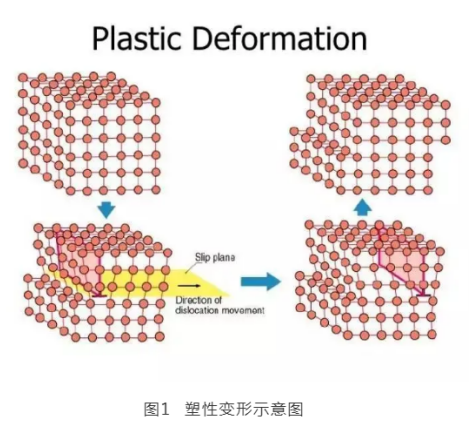
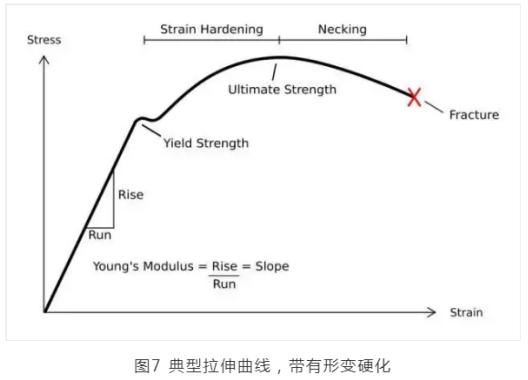
05 some basic problems for most metal materials, in the elastic deformation region, the stress is proportional to the strain, and when the stress or strain continues to increase, at some point the strain will no longer be proportional to the applied stress. At this point, the bond between the initial atoms and the adjacent atoms begins to break down and is modified with a new set of atoms. When this occurs, the material will not return to its original state after the stress has been removed, that is, when the deformation is permanent and irreversible, the material enters the plastic deformation zone (Fig. 1) .
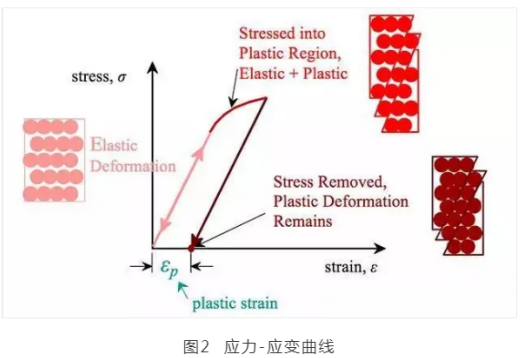
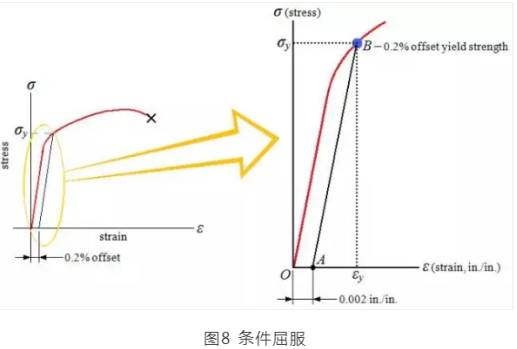
In fact, it is difficult to determine the exact point at which a material changes from an elastic to a plastic zone. Parallel lines with strain of 0.002 are plotted as shown in figure 2. Use this line to cut off the Stress–strain curve and determine the yield stress as the yield strength. The yield strength is equal to the stress at which significant plastic deformation occurs. Most materials are not homogeneous and are not perfect. The yield of a material is a process, usually accompanied by work hardening, so it is not a specific point.
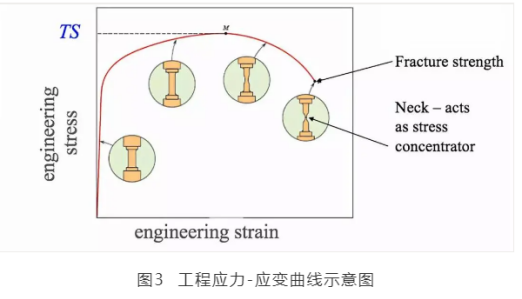
For most metals, the Stress–strain curve looks like the curve shown in figure 3. When the loading begins, the stress increases from zero and the strain increases linearly until the material yields and the curve begins to deviate from the linearity. Continue to increase the stress and the curve reaches its maximum value. The maximum value corresponds to the tensile strength, which is the maximum stress value of the curve, as shown in figure M. The breaking point is the point at which the material finally breaks and is represented by F.
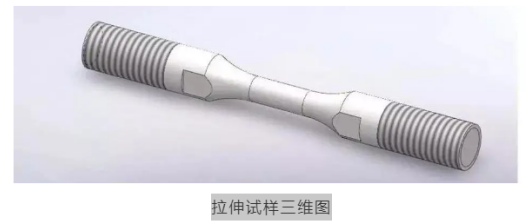
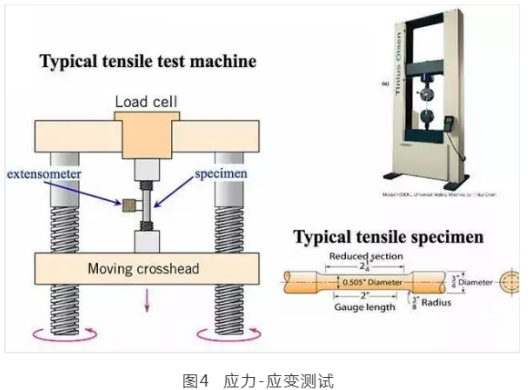
The geometry of a typical stress-strain Tester and test sample is shown in figure 4. During the tensile test, the sample is pulled slowly, and the changes of length and applied force are recorded at the same time. The force-displacement curve is recorded. The original length, gauge length and cross section area of the sample can be used to draw the Stress–strain curve.
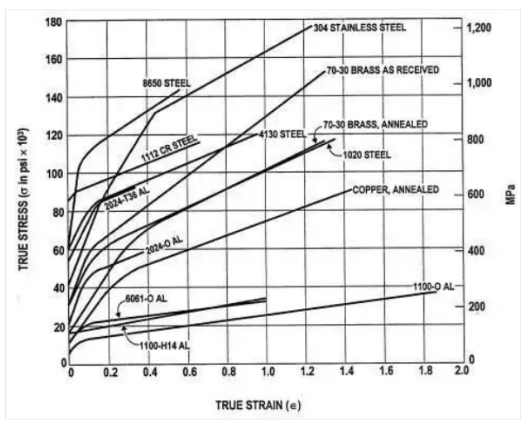
For materials that can undergo tensile plastic deformation, two types of curves are most commonly used: The engineering stress-strain curve and the true stress-true strain curve. The difference between them lies in the area used to calculate the stress, the former using the initial area of the sample and the latter using the real-time cross-sectional area during the tensile process. Therefore, true stress is generally higher in Stress–strain curve than in engineering.
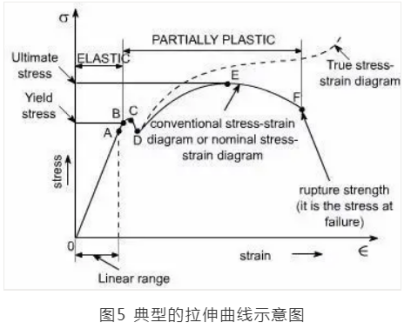
The two most common types of tensile curves are: one with an apparent yield point, and the other without an apparent yield point. The yield point represents the resistance of the metal to initial plastic deformation. This is one of the most important mechanical properties in engineering technology.
How to define the plastic deformation of actual metal in engineering? Residual plastic deformation is an important basis. Usually, the resistance of engineering metal to certain residual plastic deformation is regarded as yield strength, also called conditional yield strength. That is, there is no obvious plastic yield point, there is no obvious yield strength, to know the actual yield strength of the metal needs a criterion, so there is a conditional yield strength. For different metal components, the corresponding residual deformation of the conditional yield strength is different. For some severe metal members, the residual deformation should be smaller, but the corresponding residual deformation should be larger when the ordinary metal members yield. The common residual deformations are 0.01% , 0.05% , 0.1% , 0.2% , 0.5% and 1.0% , etc. .
The yield of metal is the result of dislocation motion, so the yield of metal is determined by the resistance of dislocation motion. For pure metals, this includes lattice resistance, dislocation interaction resistance, dislocation interaction resistance with other defects or structures.
The area of a straight line on a tensile curve corresponding to the elastic part is elastic. From the beginning of elastic deformation to the process of fracture, the total energy absorbed by the sample is called fracture work, and the energy absorbed by the metal before fracture is called fracture toughness. The change of mechanical properties is usually accompanied by the actual metal in the process of drawing, and the most prominent phenomenon is work hardening. The work hardening of metal is helpful to avoid the sudden fracture of practical engineering components under overload, which will result in disastrous consequences. Plastic deformation and deformation hardening of metals are the prerequisites for the uniform plastic deformation of metals, that is to say, in polycrystalline metals, where plastic deformation occurs, it is strengthened, and then the plastic deformation is restrained, shift the deformation to an easier place. In the actual tensile curve, most metals yield at room temperature, under the action of yield stress, the deformation will not continue, the continued deformation must increase resistance. On the true stress-true strain curve, the flow stress increases and the work hardening occurs. Such a curve is called a work hardening curve. The work hardening index N is an important plastic index, which represents the ability of material to resist continuous deformation.
Finally, let’s talk about strain rates. In general, the tensile curves of the tested metal materials are obtained at low strain rates. Only some special metal components need to be tested under high strain rate, that is, the components with high-speed deformation. Under normal room temperature strain rate, the main deformation of the material is dislocation slip or twinning.
The maximum engineering stress on the tensile curve, that is, the engineering strain-engineering strain curve, is called the ultimate tensile stress, that is, the tensile strength.
Source: Caitong
Disclaimer: Some pictures and texts on this site are collected from the Internet and are only for learning and communication. The copyright belongs to the original author and does not represent the views of our site. This site will not bear any legal responsibility. If your rights are violated, please contact us to delete it in time.


